Inspections
Inspection Tree
Scheduling a variety of inspections at various frequencies can be achieved through the inspection tree and inspection wizard. This section of the guide will help you to schedule new inspections and manage existing inspections.
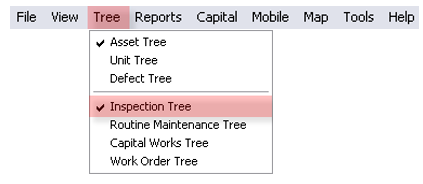
To access the inspection tree, click the Tree menu item and then Inspection Tree.
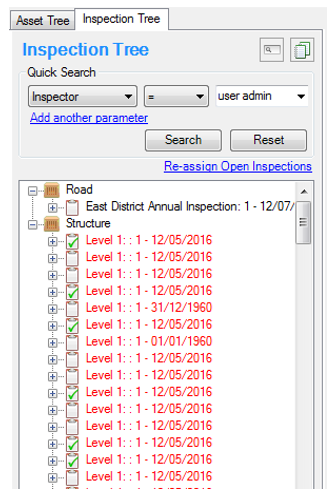
Inspections are represented in the tree by a clipboard icon. When all the units on an inspection have been ticked as inspected, a green tick will appear on the clipboard. This is an indication that the inspection is complete and is ready to be signed off.

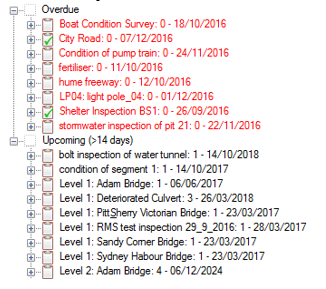
The inspection tree can be ordered in various ways. One of these options categorises inspections by their status (e.g. overdue, upcoming). The inspection tree can be configured in the Tools menu under Options.
Create an Inspection Set
If you have already scheduled inspections in AssetAsyst®, or, are just starting out, you will be able to use the inspection wizard to schedule your new inspections.
NOTE: Structure Assets will automatically start with a Level 1 inspection and a Level 2 inspection. These cannot be created manually.
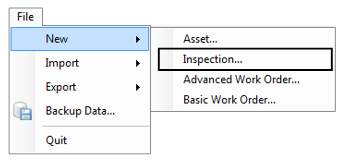
To create a new inspection, an inspection wizard is used, to access the Inspection Wizard open the menu File > New > Inspection.
Before you begin using the wizard, it is important to create Inspection Patterns and determine your Inspection Frequencies, please refer to Section 2 - 6 Inspection Setup if you have not already configured AssetAsyst® for inspections.
The Inspection Wizard is used to create each new inspection including service requests. The wizard helps you through 3 steps and ends by opening the new inspection set in the information area.
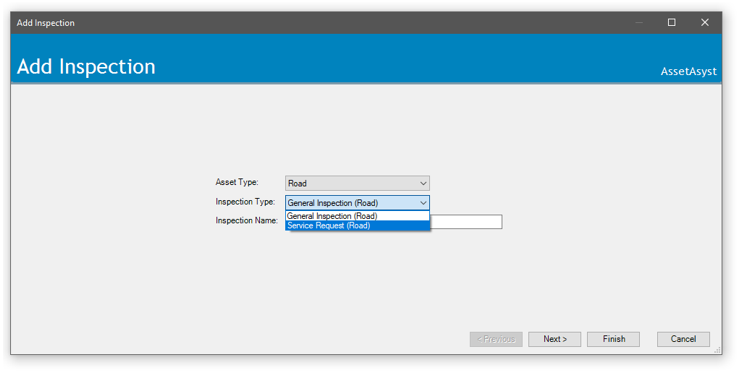
Inspection Wizard: Step 1
To begin select an asset type that the inspection is to be undertaken on and the type of inspection that is to be conducted. Then enter the new Inspection Name into the text box.
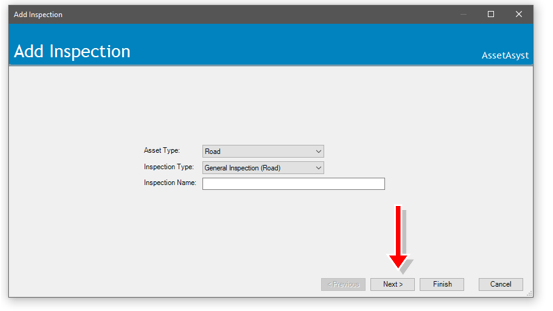 Click Next to go to step 2
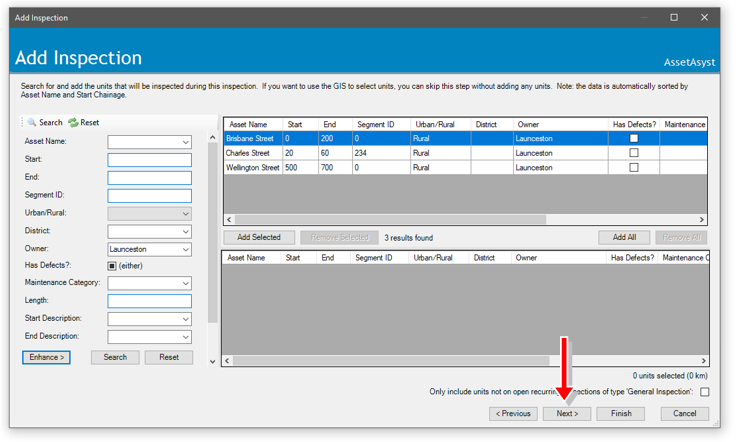
Inspection Wizard: Step 2
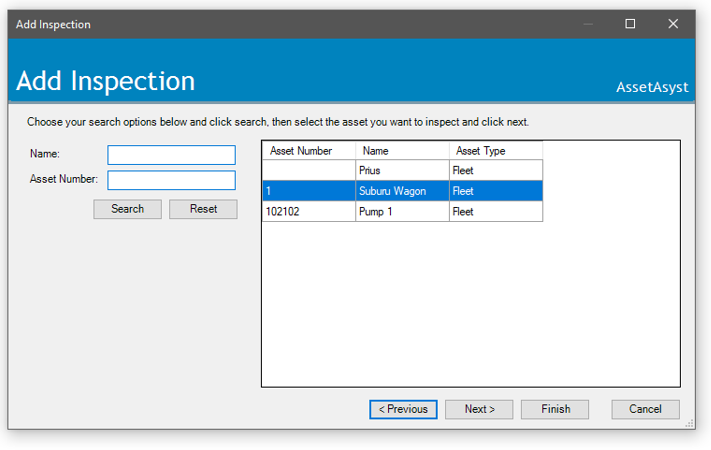
For a road or pavement inspection the next step is to select the units that are to be included in the inspection. AssetAsyst® allows more than one asset to be included in an inspection for linear type assets. Units can be filtered using the tools on the left hand side of the form. Once the relevant units have been filtered in the top data table they can be added to the inspection using the Add Selected button.
Unlike linear asset types, for bridge and point custom assets, only one asset can be inspected at a time. To select the asset for the inspection simply click the row containing the asset in the list on the right-hand side of the form. Again, there are search functions provided on the left of the form to assist with finding the required asset.
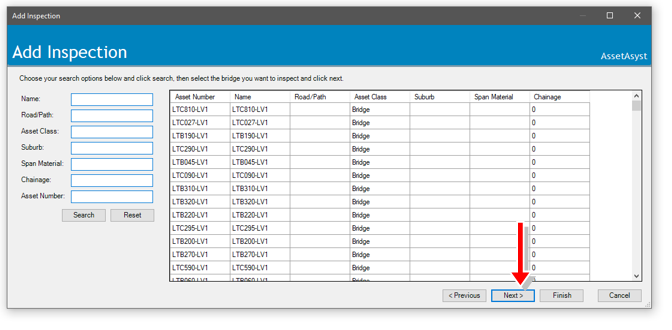
Click Next to go to step 3.
You may also click Back at any time to view and edit the previous step(s).
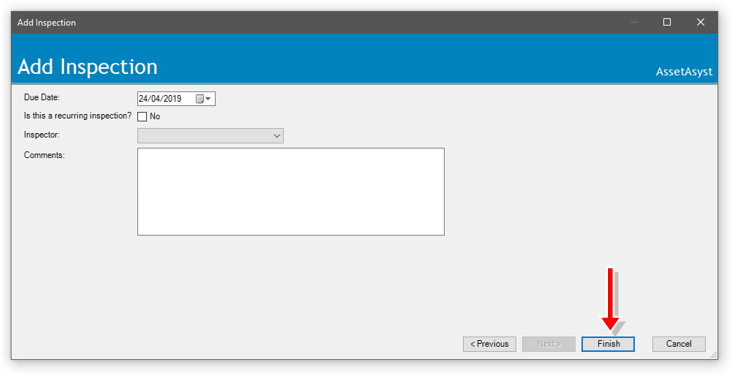
Inspection Wizard: Step 3
Step 3 requires an intended start date for the inspection to be set (default is current day). The dropdown menu can then be used to select the inspector and enter any comments about the inspection.
Finally the inspection can be set to be recurring. If the inspection is to be a recurring inspection, then a recurrence interval is also required to be set.
NOTE: If an inspection is set to recur, then a new inspection will be created when the current inspection is signed off. The new inspections due date will be based on the current inspections due date plus the recurrence interval selected.
Click Finish to close the inspection wizard and add the new inspection to your list of inspections in the inspection tree.
Service Requests
Service Requests are a specific type of inspection. They can be created by using the menu item File > New > Inspection and choosing “Service Request” as the inspection type.
AssetAsyst® treats these requests like a regular inspection, but stores extra information to ensure traceability between systems. This information is stored in the Service Request tab of the inspection information form (accessed by selecting the relevant inspection from the inspection tree.
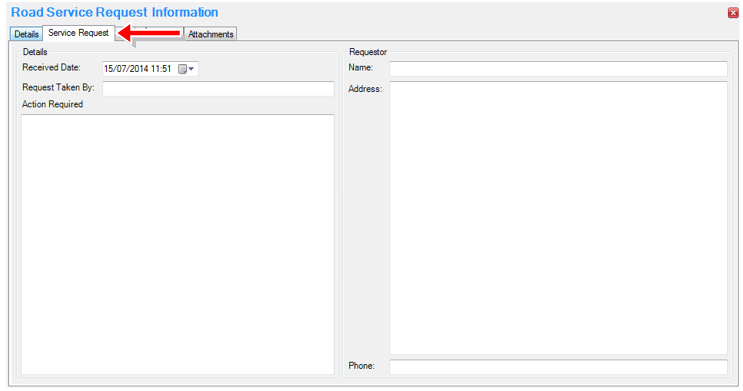
Inspectors are able to undertake the inspection and record defects as normal and can make a comment in the Action Required field of the Service request if no defect was observed. Defects are inserted into the work flow as normal.
Targeted Inspections
Usually, when inspected an asset such as a bridge, you will want to assess all components of the asset, but there are time when you want to perform a targeted inspection on a particular subset of components. AssetAsyst provides for this on structures and custom assets.
Untick the Allow All Units checkbox.
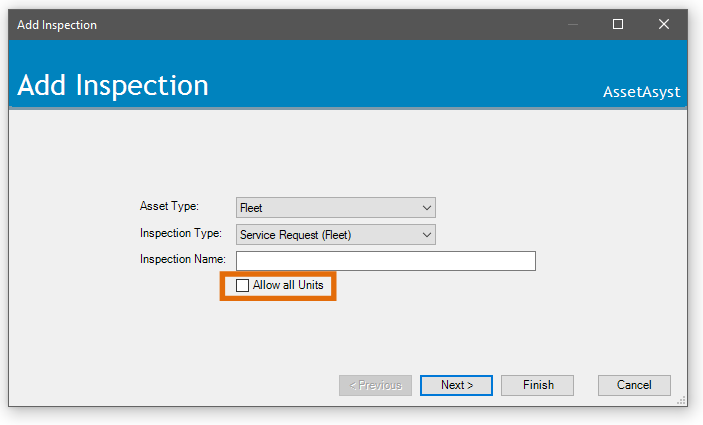 Select an asset.
Choose which components you want to inspect.

Modify Existing Inspections
Inspections sets can be modified at any time unless they have already been signed off.
Use the inspection tree to manage all inspection types for all asset classes. It integrates with the Map window to allow display of the assets to be inspected for the selected inspection set.
By Map Interaction
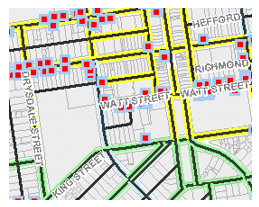
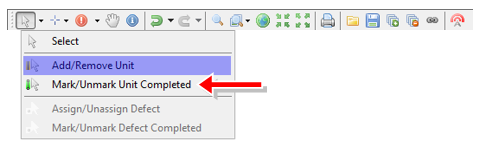
Inspections sets can be created and edited using the map interface. To create or edit an inspection set; first, select the inspection in the Inspection Tree. The window will zoom to the extent of any assets that are to be inspected. The Assets that require inspection but have not yet been inspected will appear yellow in the map, whilst those assets that have been inspected will appear green.
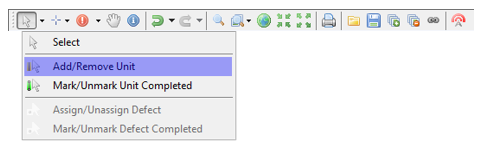
To add or remove units, choose Click the Select tool on the GIS toolbar (arrow icon). A menu will drop down. Click the Add/Remove Unit option. Select one or multiple assets to add into the inspection set.
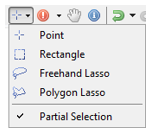
You can adjust the way that you select units by dropping down the selection-type toolbar option.
Click Save to store the updated inspection set.
If using point selection, clicking on a unit that is already in the inspection set will remove it. If using Rectangle, Freehand or Polygon Lasso it will add units if they aren’t already part of the inspection set. Hold down Alt while using these tools to remove units from the inspection set.
By Modifying Existing
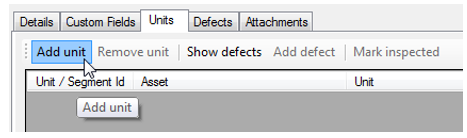
In the Unit tab (sometimes called Component Assessment) of the inspection information form click the Add Unit button. For linear and building inspections, this will display the same dialog that you saw at step 3 of the Inspection Wizard. This will show you all units currently in the inspection set and allow you to add or remove them.
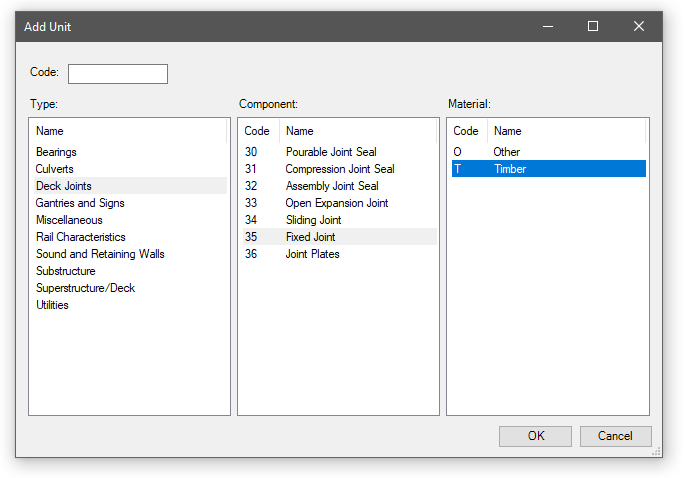
 For structure and point custom assets, a dialog will be displayed that allows you to create new units. These will be added to the asset, as well as any open inspections.
Printing Inspections
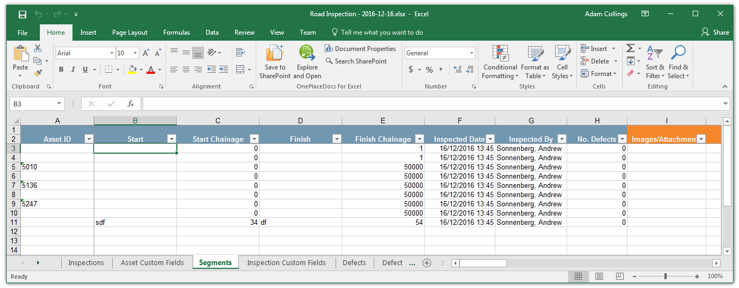
To print an inspection report, click the Report button on the Inspection Information pane. This will create a standard inspection report in Microsoft Excel format. NOTE: The inspection must be signed off before the report can be generated.
 **Example Inspection Report Spreadsheet
Assign the Date, Time and Inspector
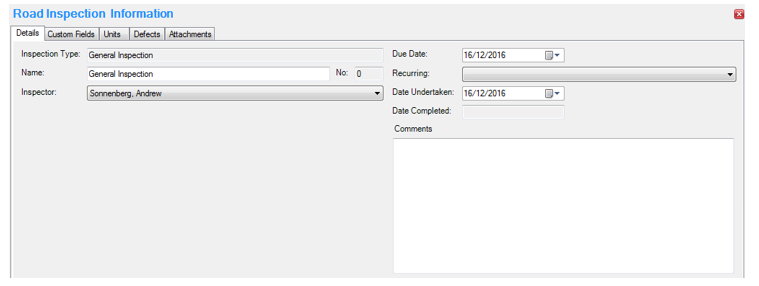
Inspection data can be manually entered into AssetAsyst® through the inspection information form.
Inspecting Units
Simple Inspections
On simple inspections, inspected units can be marked off by filling out the appropriate details in the Units tab.
Click the Inspected? checkbox in the grid to automatically fill in these details based on the current time and inspector assigned to the inspection.
For users that do not have access to the map facility; use this tool to assign a date and time of inspection and inspector name to each unit.
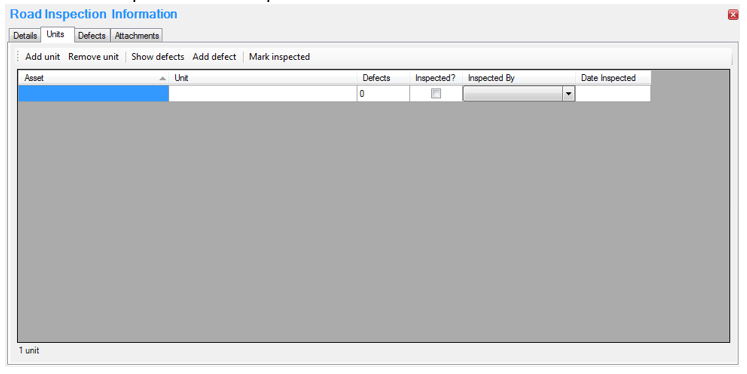
Users with the map tool are able to mark units as inspected using the mark units inspected tool.
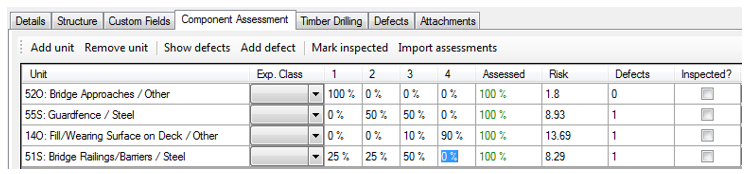
Condition Inspections
On condition inspections, such as level 2 structure inspections, the units tab becomes a component assessment tab. Additional columns are displayed for the entry of condition information for each unit.
The inspector will indicate how much of each unit is in conditions 1, 2, 3 and 4 (optionally 5) (condition 1 being the best and 4/5 being the worst). For a VicRoads structure, the inspector will enter percentages. For the Queensland methodology, the inspector will enter quantities.
Signing Off Inspections
When an inspection set has been completed, the responsible officer can click Sign Off to sign off the inspection. Before the inspection can be signed off, all units must be marked as inspected. In the case of a condition inspection, each component must be fully assessed (unless a comment has been logged explaining why the component cannot be assessed). The exception to this is an inspection that has been marked as an "exceptional inspection." These inspections are used to log defects, or exceptions, only.
Inspections sets marked as recurring will automatically refresh and display a new inspection set with a due date based on the recurrence frequency. The closed inspection is sent to the archive. Archived inspection sets can be accessed by clicking the View All checkbox in the Inspection Tree pane and will appear green, but can’t be edited, only viewed.
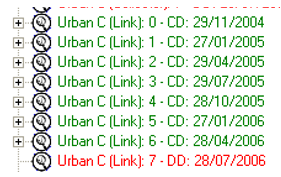
NOTE: Red text highlights that an inspection is overdue.
Historical Inspections
A sequential number displayed at the end of the Inspection Name uniquely identifies each inspection. Each time an inspection is signed off this number changes. If the inspection is not a recurring inspection this number will be given a “0” value and the inspection will be archived once signed off.