
Mobile App
The Inspector app runs on tablets and smart phones. The user-interface has been optimised for a standard sized tablet. The app integrates with AssetAsyst® and allows you to conduct inspections of structure, linear, and custom asset types. It can also be used by a works crew to sign off work packages.
Transfer data to the tablet
AssetAsyst Mobile runs on both Android and iOS devices. Both support syncing with the cloud over the internet. The Android version also supports manually copying the data package to the device via USB or Wifi.
From the AssetAsyst® Mobile menu, choose “Export to Inspector Tablet...”
 The Data Transfer Tool will open. This tool is used to transfer data between the AssetAsyst® server and the tablet.
 The main section of the Data Transfer screen shows a list of assets from AssetAsyst®. This list can be filtered using the left-hand pane.
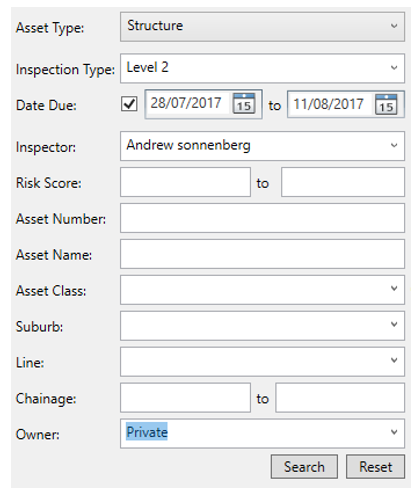
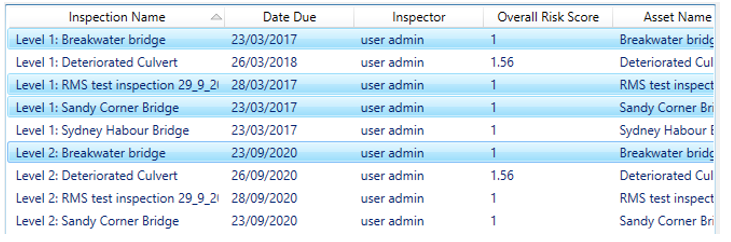
You will notice two grids. The top grid represents the results of the most recent search. The bottom grid represents the inspections that will be exported to the tablet.
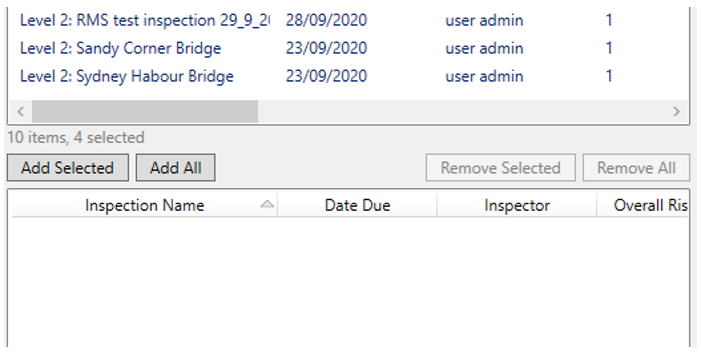
Select the structures by clicking on them (ctrl+click to select multiple) that you want to copy onto the tablet, or click the Add All button.
 Once you have selected the desired inspections, use the “Add Selected” button. This will move the selected inspections to the bottom grid.
The Data Transfer Tool allows you to customise which generic data fields will show up on the tablet. To view the field selector, click the blue strip down the right-hand side of the window. This allows you to keep things simple and avoid clutter from fields you don’t want to see.
Click once to select a field. A green flag means that the field will be visible on the tablet. Click again and the flag changes to red. A red flag means the field must be given a value in order to sign off the inspection.
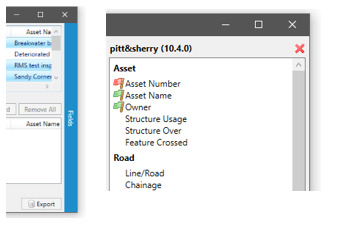
You can choose from an extensive list of fields, including custom fields that have been defined in AssetAsyst®.
When you have finished selecting the data you wish to copy, click the Export button in the bottom right-hand corner.
The Data Transfer Tool will now create a package containing all the structure data for the tablet. Choose a location where you want the package created and click the “Export” button.
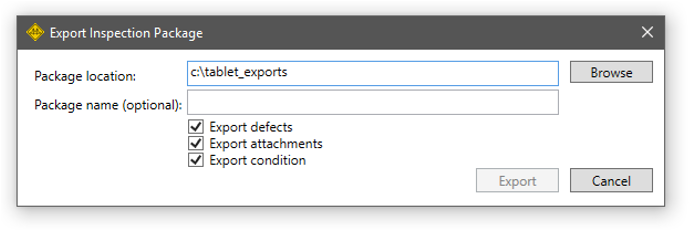
NOTE: If you are running AssetAsyst in the cloud, and want to take advantage of the sync feature, when prompted for a package location, choose the “Home Folder \ Packages” folder. (Note, this is not a folder on your computer, but on the virtual machine in the cloud.) The mobile app will look in this location for packages.
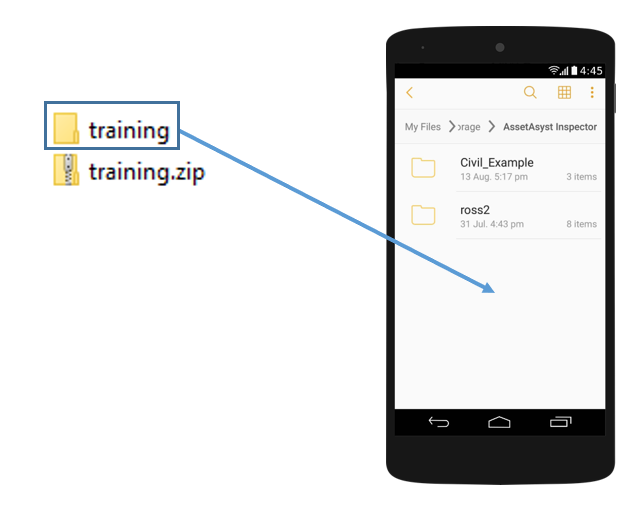
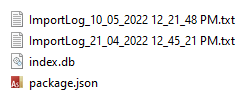
The data will now be exported as a package to the file system. A package consists of a folder containing two files - index.db and package.json (respectively). It may also include additional files for photos. This folder needs to be copied to the tablet. There are a number of ways to do this.
Syncing the Mobile App with the Cloud
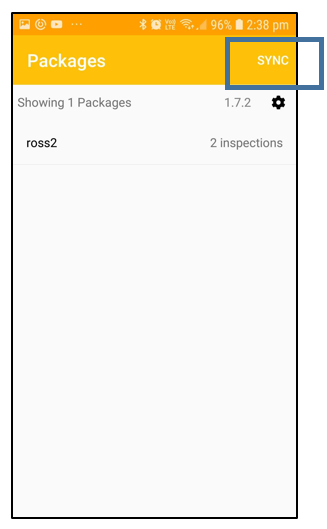
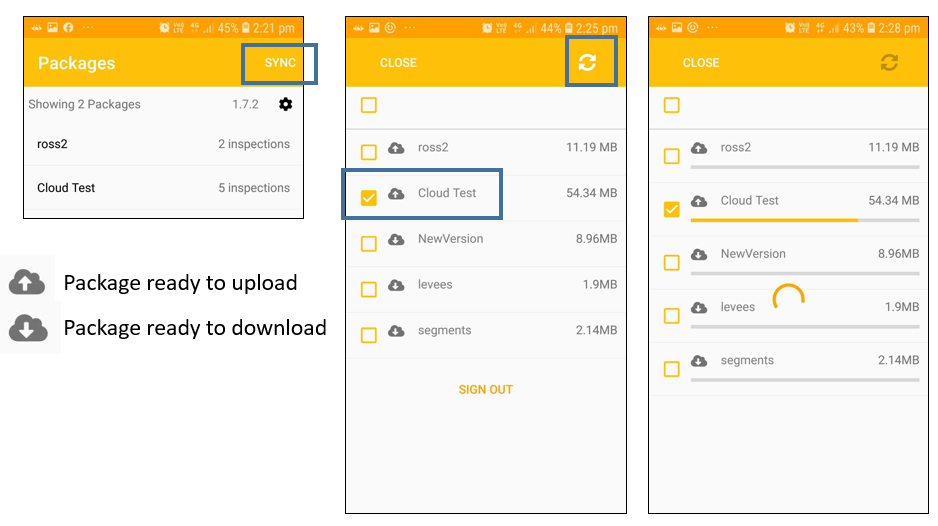
If you are running the cloud version of AssetAsyst, you can sync the inspection package directly to your device.
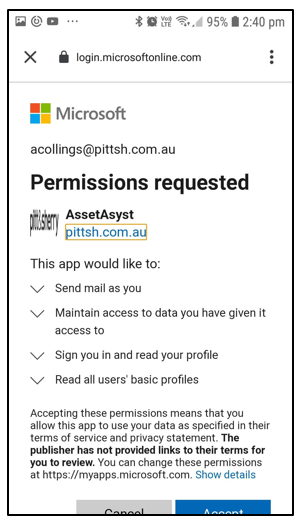
From AssetAsyst Mobile, tap the sync button.
Log in using your Office 365 credentials. A Microsoft Office 365 account is required for using the sync process.
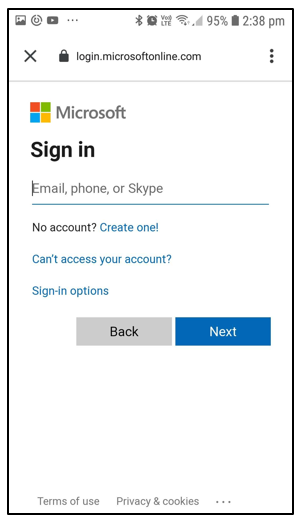
You may need to grant permission to the AssetAsyst Mobile app the first time.
Once you are logged in, the sync page will display a list of packages available, including those on your device, and those in the cloud.
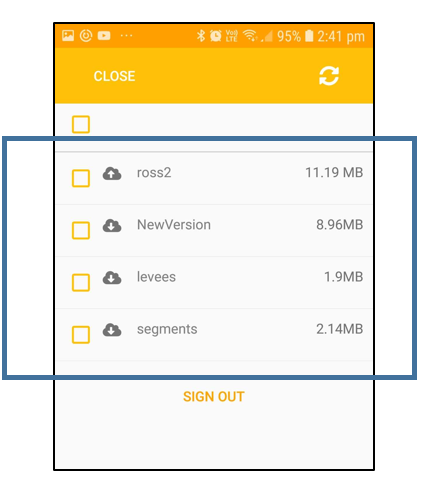
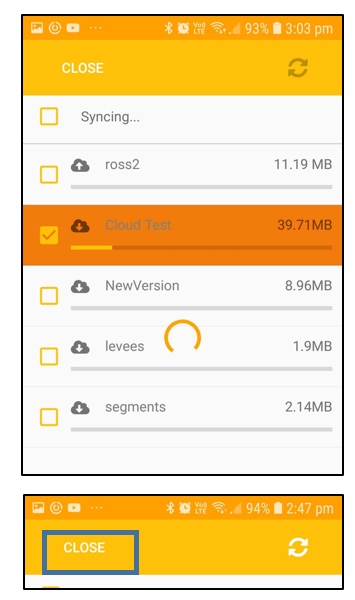
Tick the package or packages that you want to download. Then tap the refresh button.
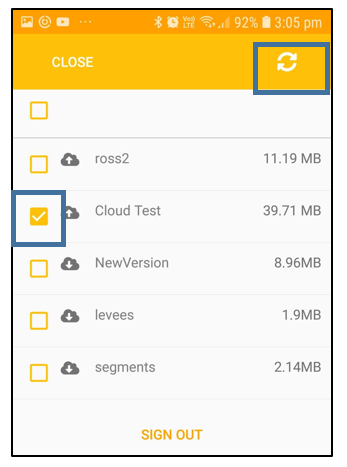
The packag(s) will be downloaded. Once the download is complete, tap the close button.
Transferring Package via USB Cable
If you are running a standalone local installation of AssetAsyst on your local premesis, you will be unable to use the cloud sync feature, and will need to manually copy the package data to your phone or tablet. Note that this feature is only available on Android devices.
Connect your android device to your computer using the USB cable that came with it.
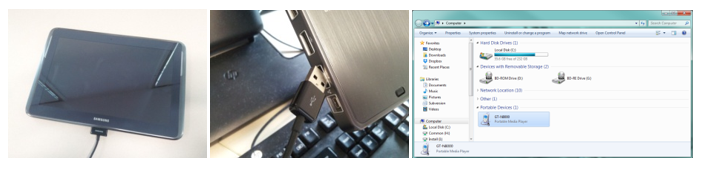
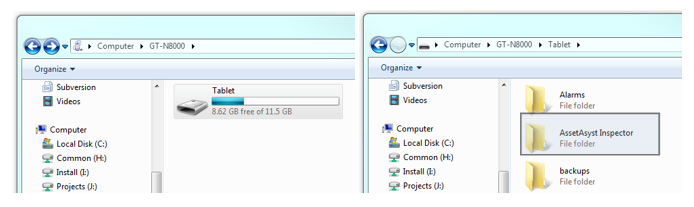
Open File Explorer and browse to your computer – you should see your device. (NOTE: Troubleshooting communication issues between your computer and your Android device are beyond the scope of this manual).
Open up your device and locate the “AssetAsyst® Inspector” folder. This is where you need to place your package. If this folder does not exist you can create it by right-clicking in the tablet window and choosing “New Folder”
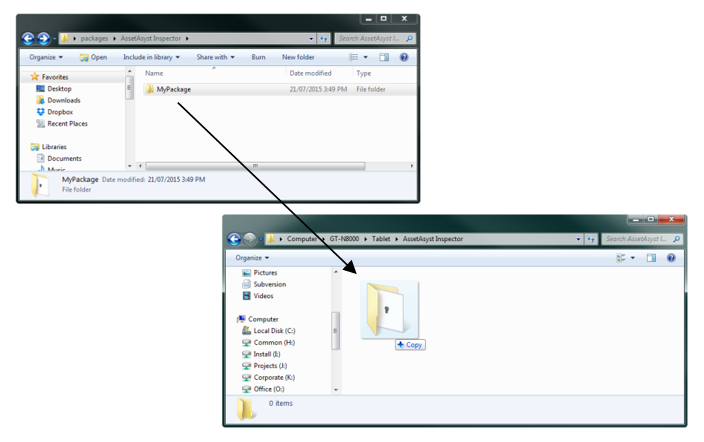
The package is now on your device ready to go.
NOTE: Before you disconnect your device, please use the Safely Remove Hardware feature of Windows.
Transferring Package via WiFi
As an alternative to copying the package using a cable, you may wish to use your wireless network. There are a multitude of ways to do this with an Android device.
Two apps we recommend you consider are:
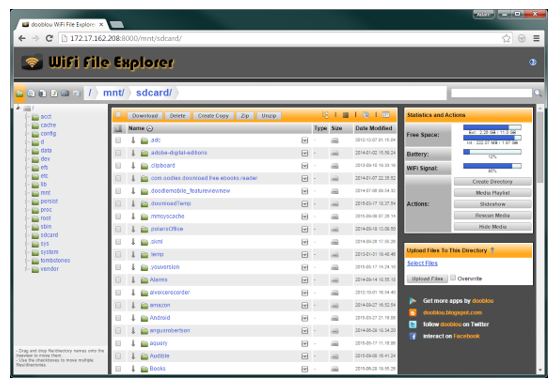
Wifi File Explorer
This app gives you an address to type into your web browser. You are then presented with a web-based interface to the file-system of your device.
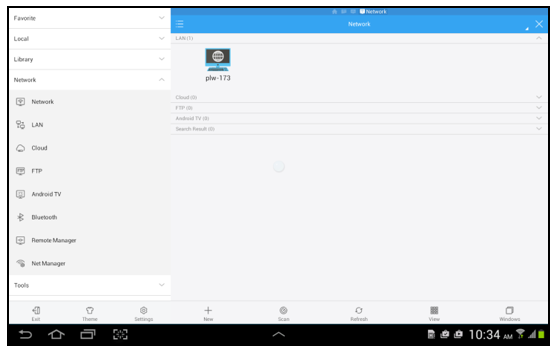
ES File Explorer
ES File Explorer is a file browser that runs on your Android device. It can be configured to access network shares on your computer across the network. This allows you to pull files onto the tablet through WiFi.
Conducting an Inspection on the Tablet
The inspector app, AssetAsyst Mobile, can be downloaded for free from the Google Play store, or the Apple App Store.
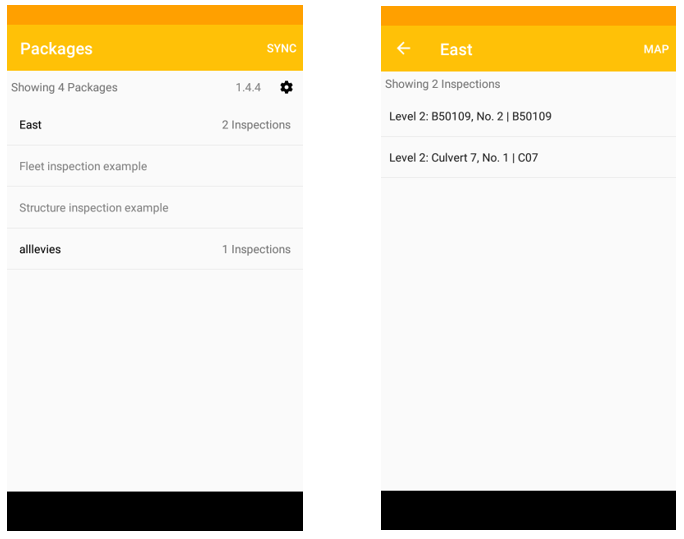
When you first launch the Inspector app you will be presented with a list of structure inspections. NOTE: If you have copied multiple packages, you will first see a package-selection page. Tap on an inspection to open it.
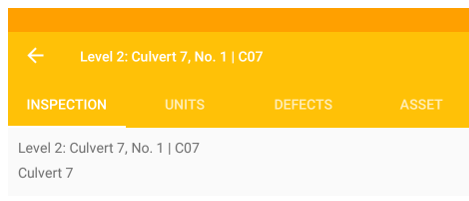
Once the inspection loads, you’ll see the inspection details page. You will notice a number of tab-page buttons along the top of the screen. These allow you to switch between the various pages.

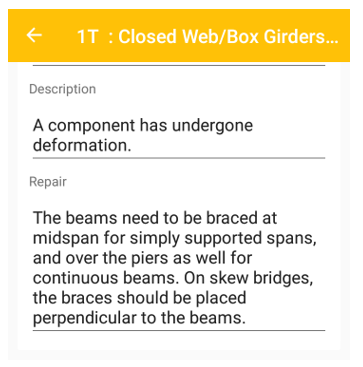
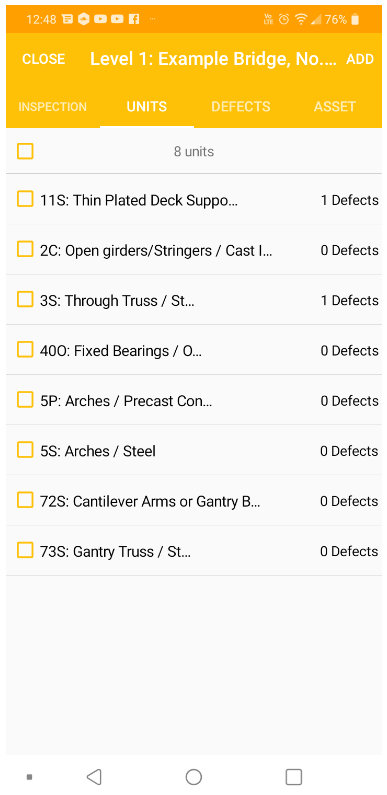
Condition Inspections
Condition inspections (such as level 2 bridge inspections) require you to rate the condition of the components of the asset. You can also log defects on those components that are defective.
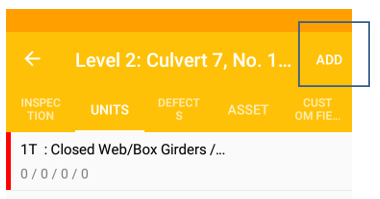
The units page will show a list of all existing components on the asset. If this is the first time the asset has been inspected there may not be any components yet. You can add a new component by tapping the “Add” button.
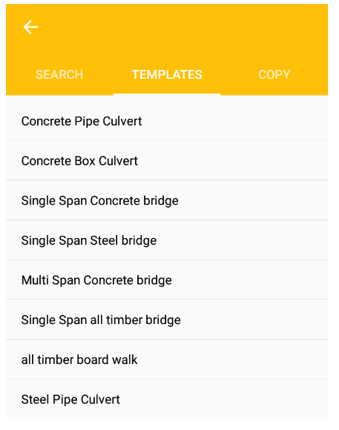
A list of possible component types will be displayed:
Filter the list by typing in the box at the top, and select a component type by tapping on it. The component will be created.
The Inspector app supports multiple inspection methodologies. In regards to structure assets, there are two different behaviours: VicRoads and Queensland. Components are handled slightly differently between the methodologies. All other asset types operate with the same behaviour as the Vicroads methodology.
Tap a component to view or edit its details.
Component Assessment
The component detail page allows you to define the condition, and add defects. (For structure assets, such as bridges and culverts, it also allows you to define geometry).
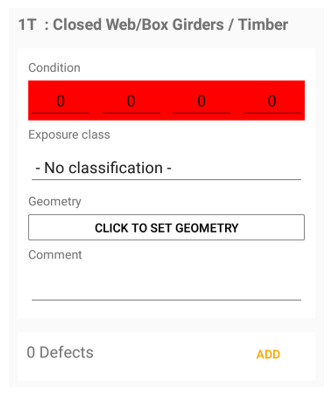
You will notice four text boxes with a red background. These boxes represent the quantity of the component that is in conditions 1, 2, 3 and 4. For assets using a Vicroads-based methodology, this number represents a percentage.
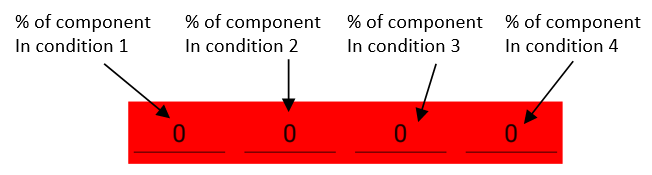
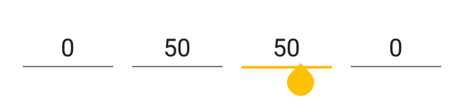
Enter values in these boxes until they collectively add up to 100%. One the component is fully assessed the red background will change to white.
You can also specify an exposure class, set the location of the component and enter a comment.
If the asset uses a Queensland-based methodology, the condition numbers represent a quantity. The unit of measure of the quantity is determined by the component type. For example, a bridge kerb might be measured in metres, but a deck slab would be measured in metres squared.
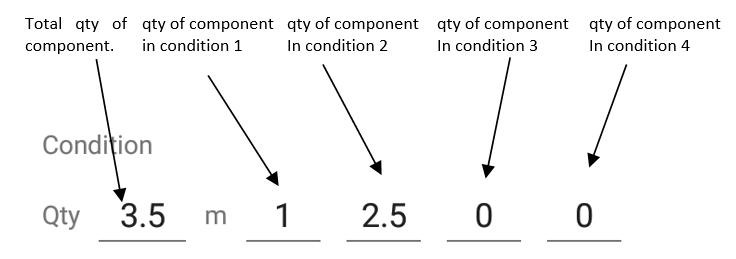
Condions 1,2,3 and 4 must add up to the total quantity of the component.
Queensland Grouping Interface
The Queensland TMR methodology requires that bridges be broken to a very fine degree. This can result in a very large number of components. Because of this, AssetAsyst Mobile offers an alternative grouping interface, which combines together multiple instances of the same component type under headings. Think of these headings as the equivalent VicRoads component, with the finer detail underneath.
When adding a new component using the Queensland methodology, you can add them one at a time as with VicRoads, or you can add them in bulk using a template.
To add using a template, tap the box next to the “Template” button when adding a component
After selecting a template, the asset will be automatically populated with a set of pre-defined components.
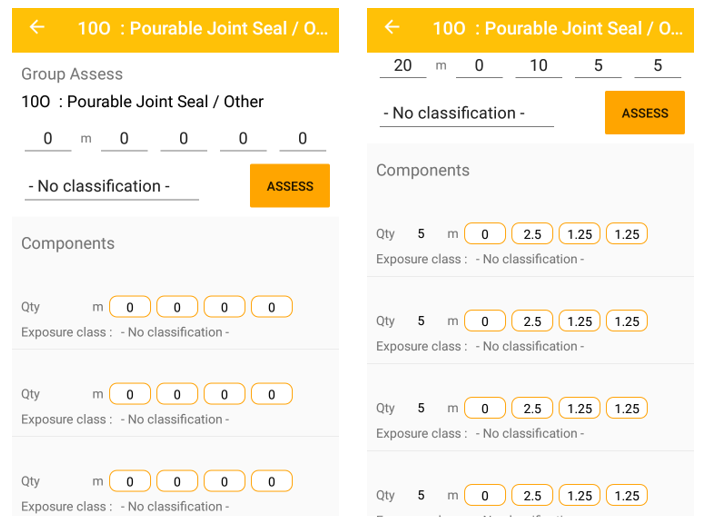
To enter the grouping interface, click the “Group” button at the top of the page.
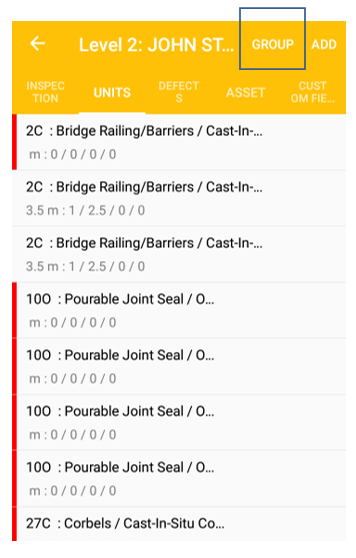
The group interface displays all units grouped by component type.
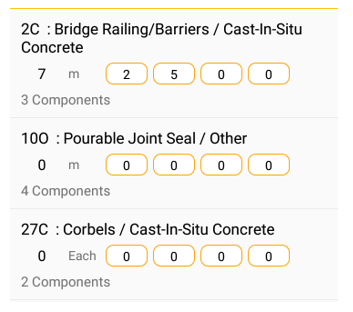
You can also add components in bulk from the group interface but tapping the “Add” button.
Set the component type, quantity, and numbers for modification, group and component.
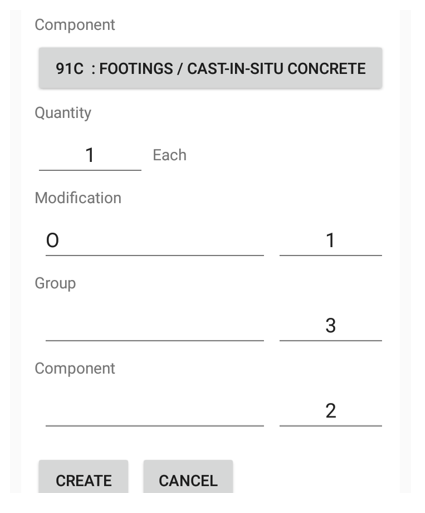
When we click the “Create” button, the app will generate 6 components (1 X 3 X 2).
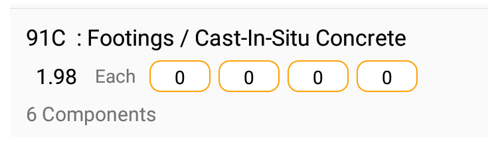
Click on one of these groups to view the individual components within the group. To assess all components together, enter the quantity and condition at the top and then click the “Assess” button. The quantity and condition will be divided up amongst the components equally. (You can then tweak these values to represent the actual condition of the individual conditions).
Defects
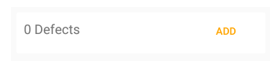
The component page gives a defect count at the bottom. To add a defect, click the “Add” button.
 The defect details will appear.
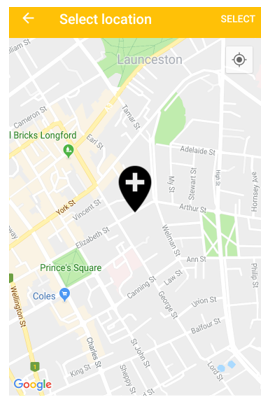
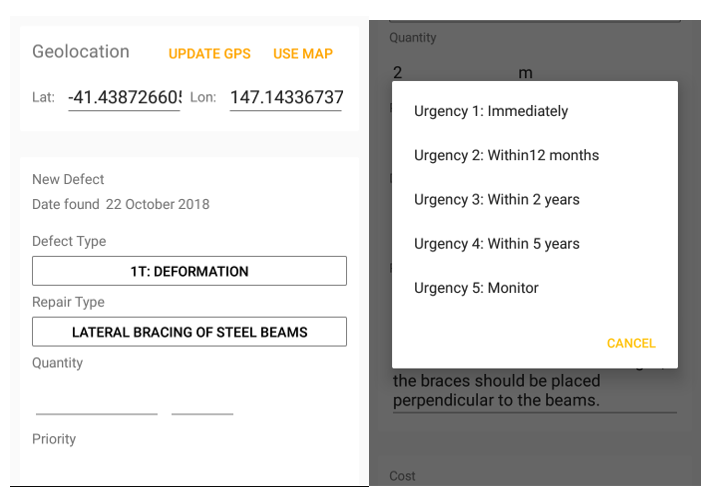
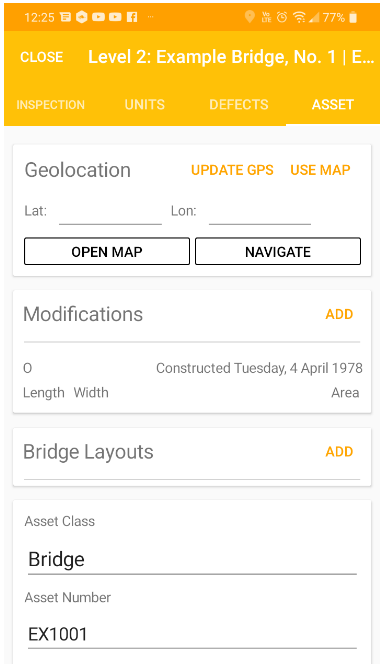
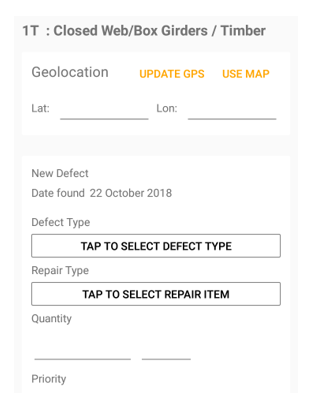 The defect can be geo-located in one of two ways. You can click the “Update GPS” button, and the app will set the defect’s location to your current location, based on your device’s GPS. Alternatively, you can click the “Use Map” button. Then drag the map with your finger to position the pin over the location of the defect.
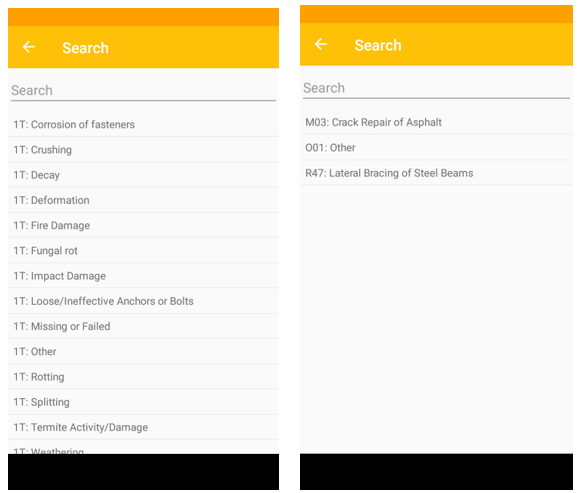
 Select a defect type by tapping the button and selecting from the list. Then tap the Repair Type button. The list will automatically filter to those repair items that are relevant to the defect type.
 Select a defect priority by clicking the field and selecting from the list.
 Several fields in the defect can be automatically filled by the defect type and repair type. Most notably are the description and repair fields. This default text comes from the defect and repair configuration in AssetAsyst. This can save significant time in the field by reducing the amount of typing that is necessary on the touch screen, but these descriptions can also be edited to customise them as necessary.
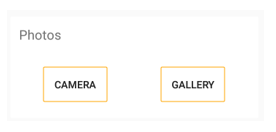
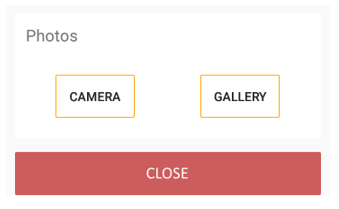
 You can add photos to a defect from either the camera or the gallery
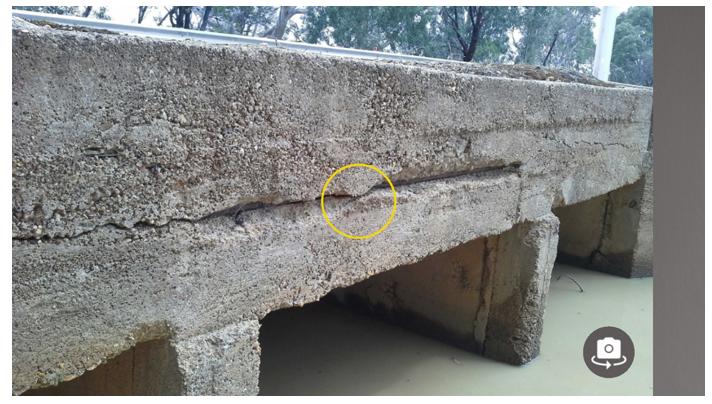
 The camera app on your device will be launched. Take a photo as desired and then tap the “Save” button. You can type in the box under the photo to name it.
 If this asset has previously been inspected using AssetAsyst® in the past then you may see existing outstanding defects found by the previous inspector. You can re-assess these defects by editing any fields that you see fit.
If a previously identified defect has been fixed, or is otherwise no longer relevant, you can close the defect. Click the “Close” button.
Asset Details
Using the “Asset” page, you can update the details of the asset being inspected.
Completing the Inspections
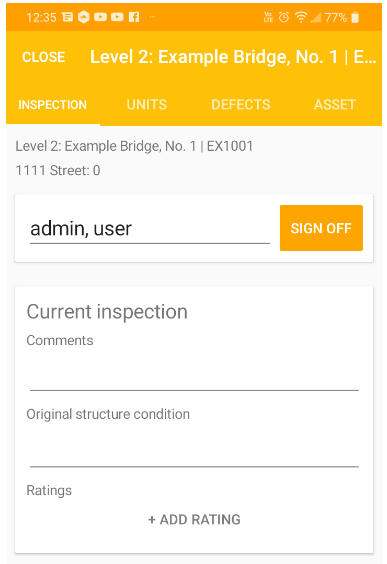
Back on the “Inspection” page, you can enter a comment and an overall rating, as well as ratings for each individual modification.
 When you have finished, entering the component and defect information, you need to sign off the inspection so that it can be imported back into AssetAsyst®.
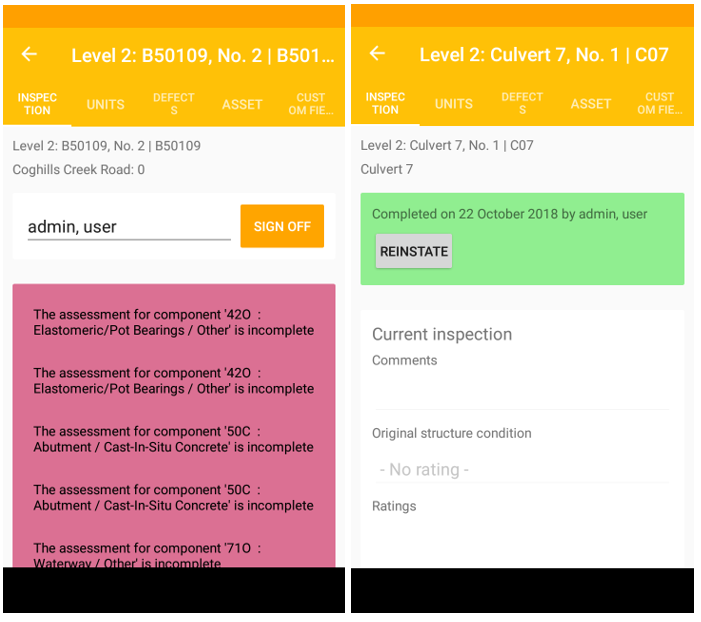
Tap the Sign Off button
The Inspector app will then validate the inspection. If there are components that have not been fully assessed, or other vital information that is missing, you will be prompted with a series of messages at the top of the page.
Defect Inspections
Defect inspections (such as level 1 structure inspections, or road inspections) do not require inspectors to assess the condition of components, only to log any defects and mark each component inspected.
AssetAsyst® allows defect types to be configured to specific inspection types, so you can have a unique set of defects for your level 1 structure inspections, separate from your level 2 defects.
Before the inspection can be signed off, all components must be ticked as inspected. You will find the inspected checkbox next to the component name.
 Alternatively, you can mark all components inspected using the button at the top.

Transferring the data back into AssetAsyst
One the inspections have been signed off, you are ready to import the data back into AssetAsyst. If you are using AssetAsyst in the cloud, you can do this using the sync feature. Tick the package you wish to sync up to the server and click the refresh button.
If you are using a local on-premesis installation of AssetAsyst, you will need to transfer the package back to your computer via USB cable or wifi.
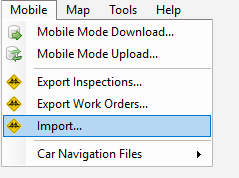
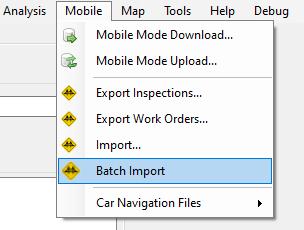
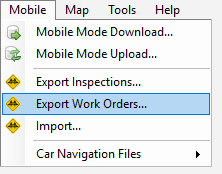
Once the package has been synced back to the server (or copied to the local computer) open the data transfer tool from the Mobile menu. Click Import from Inspection
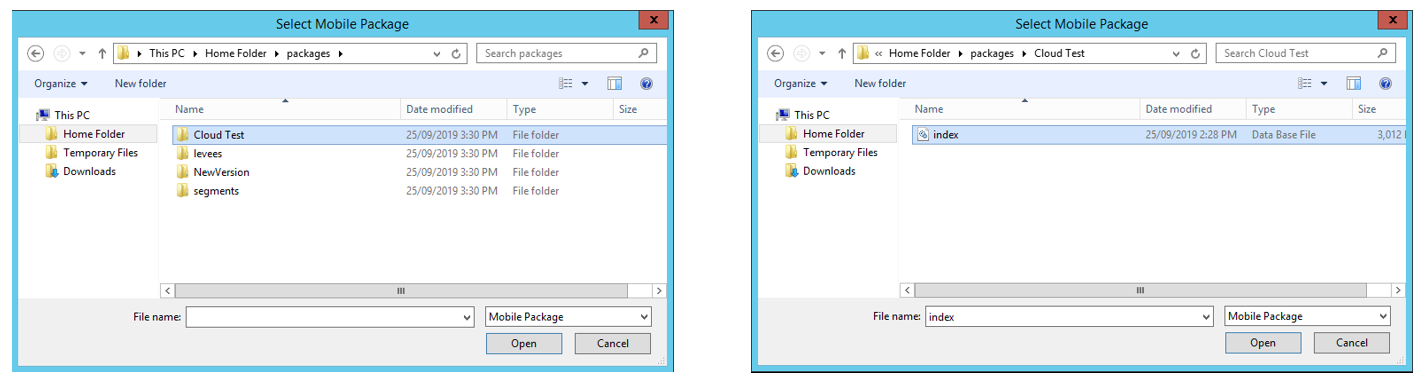
Locate and select the index.db file in the package. If you are on the cloud, the package will be in your "Home Folder \ Packages" folder. Click Open. The data will be imported back into AssetAsyst®.
The completed inspection data will now be in AssetAsyst.
Importing Multiple Packages at Once
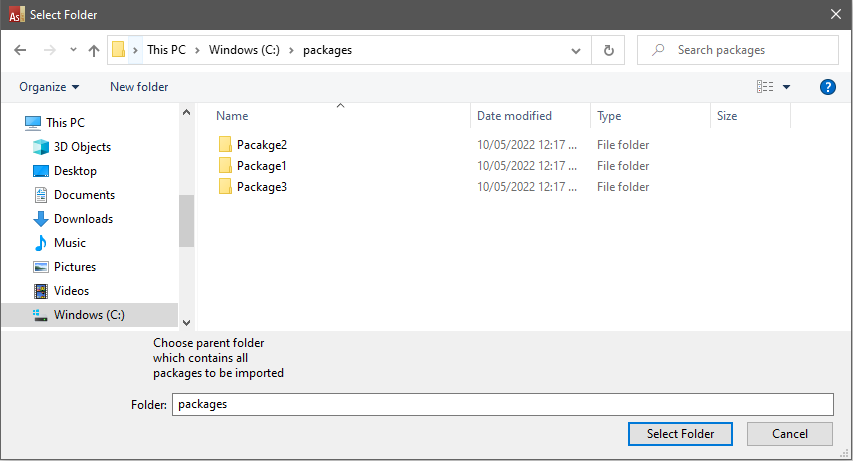
If you have a large number of packages that you want to import on a regular basis, it can be time-consuming to select them one by one and wait for them to import. For this reason, AssetAsyst offers a bulk import option.
For this feature to work, all packages need to be contained within a parent folder.
Select the parent folder, and all packages within that folder will be imported one after another.
If there are any data errors while importing the package, an error screen will display as normal. At the end of the process, a summary will appear to detail which packages succeeded, and which failed.
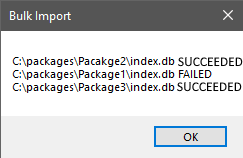
Each time you perform the import, a log file will be created within the package folder. This log will contain more details about the particular error.
Carrying out Works
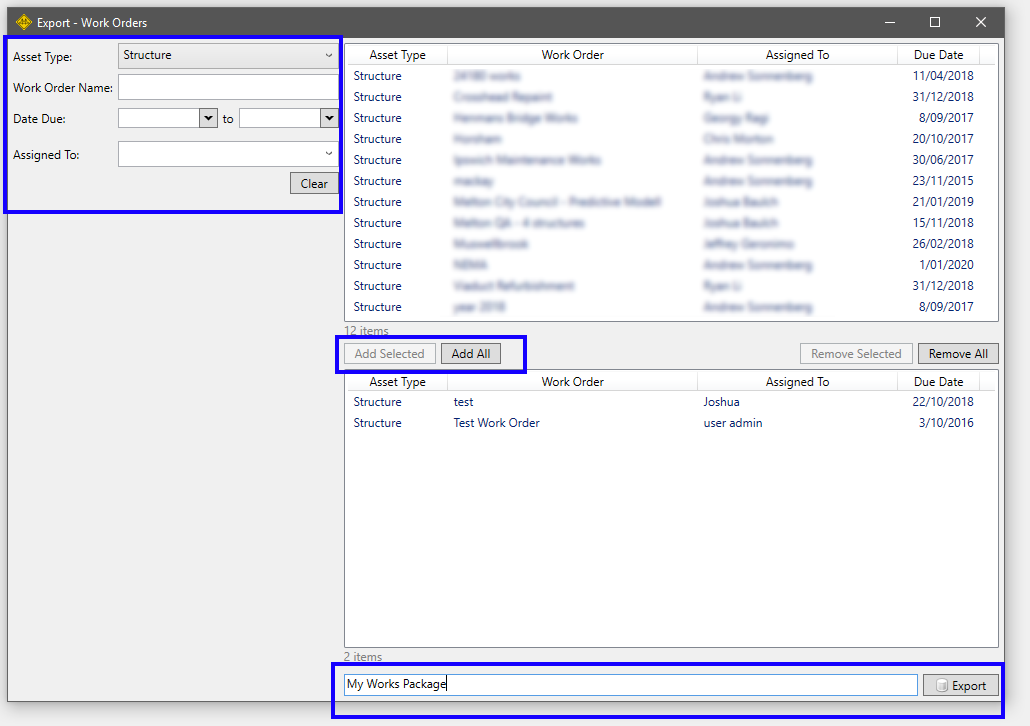
In addition to inspections, the AssetAsyst Mobile app can also be used by works crews to resolve defects. Defects can be assigned to a works crew or contractor in AssetAsyst in a basic work order. This work order can then be exported to mobile.
The process of creating a works package is very similar to the process for creating an inspection package. Use the filters on the left to find suitable works packages. Add the desired packages to the bottom list using the Add Selected and Add All buttons. Then give the package a name and *click8 the export button.
As with inspections, use the sync process to transfer the package to the phone or tablet, or copy the files manually if you are using an on-premesis installation of AssetAsyst.
On the mobile device, select the package and then select the work order you wish to complete.

From the defects page, you can tap the checkbox to close defects. You can also group the defects by asset, unit, or defect type, and then close all the defects in a group.
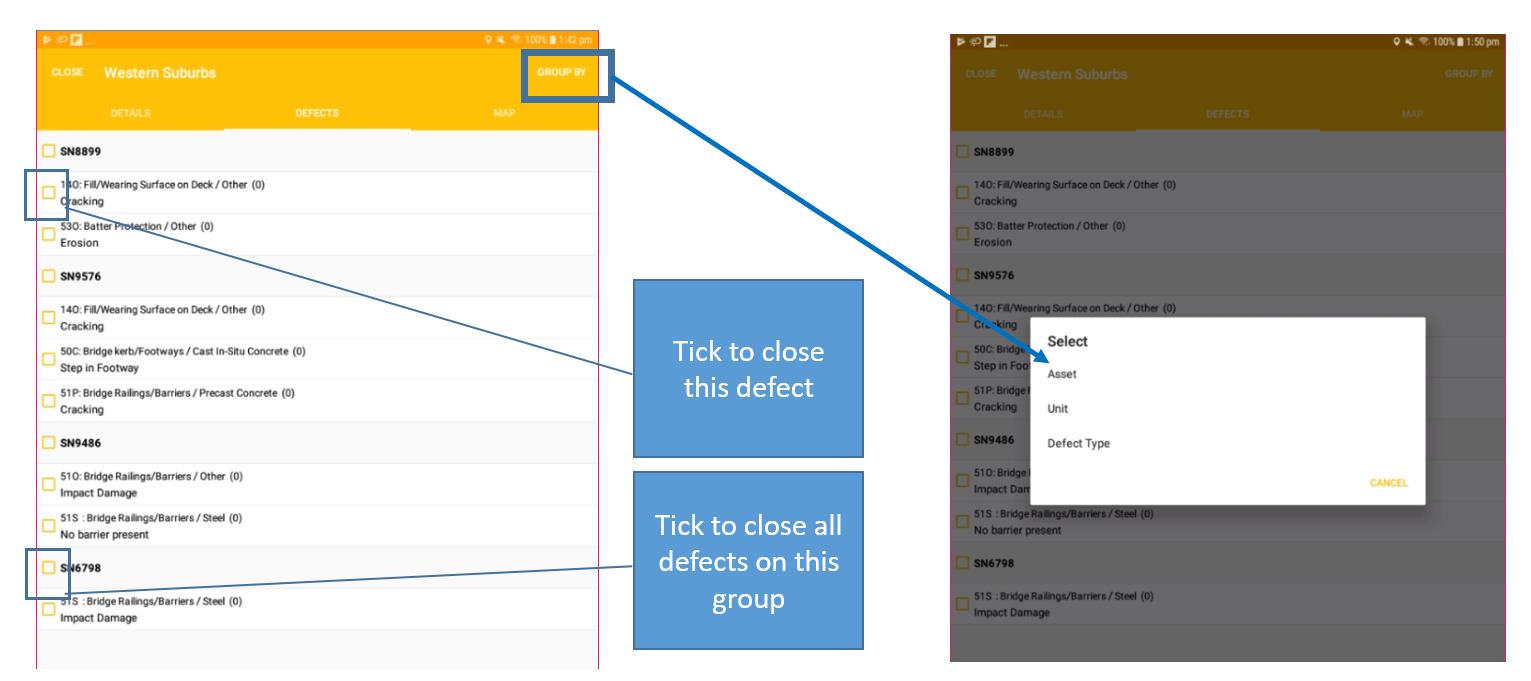
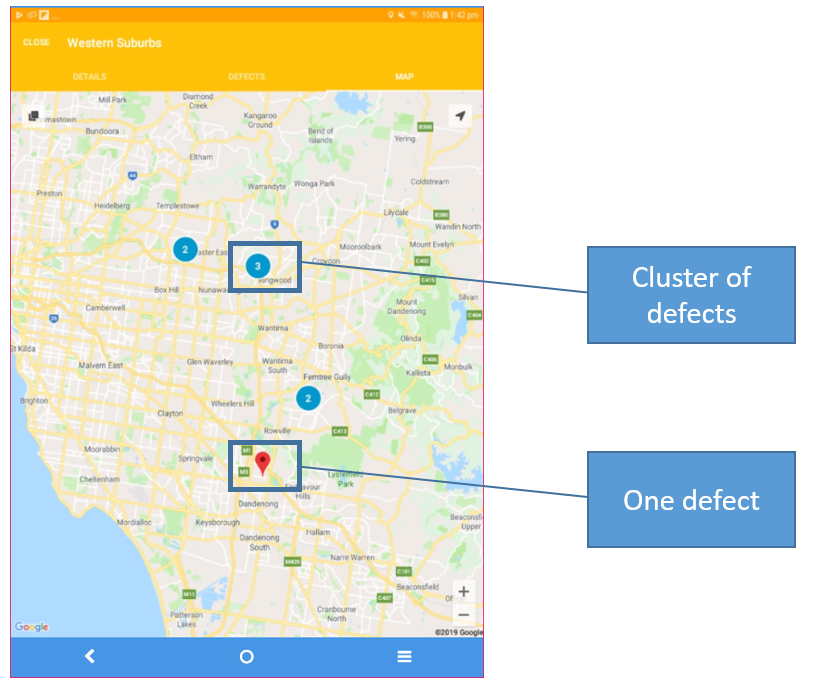
The map page displays the locations of defects. Defects that are close together are clustered. As you zoom in closer, they will seperate.
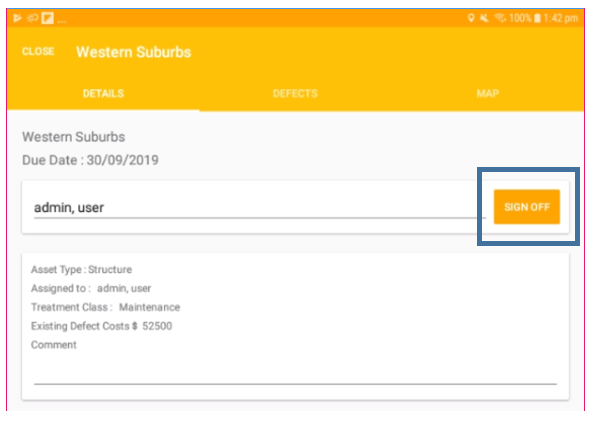
When the works have been completed, return to the details page to sign off the work order.
Then use the sync or manual copy process to copy the package back. Import the package into AssetAsyst in the same way that you import an inspection package.