
User Setup
Users gain access to AssetAsyst® by having a user access name and password. Each user may require different access privileges and so the “User Setup” form allows the administrator to allocate those privileges.

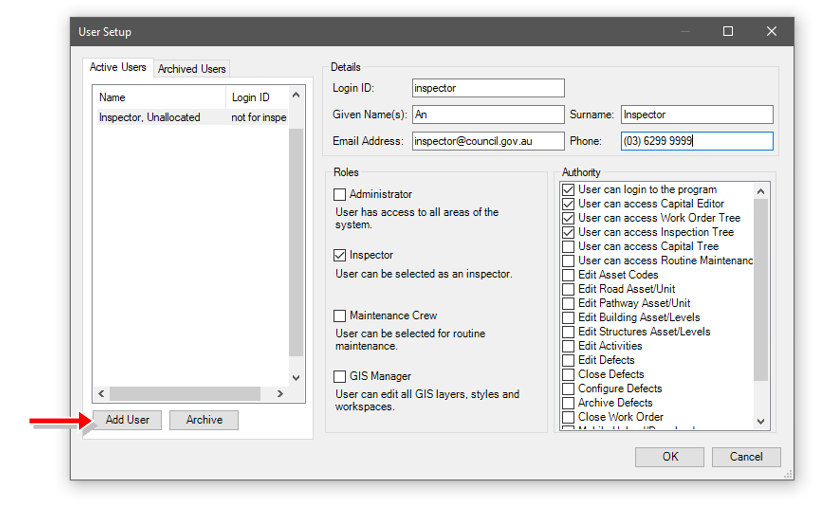
Add New User
A new user can be added by clicking the Add button. Existing user details can be edited by clicking the Edit button and users no longer required can be deleted by clicking the Delete button. New users will not be required to insert a password.
Permissions
The “Permissions” section allows system administrators, works managers and asset managers to restrict user access and rights to specific elements of the software.
Roles
Users can be allocated to a role. Each role allows that user to be allocated to inspection works and/or maintenance works, or conduct more detailed GIS work.
Authorities
“Authorities” provide the system managers with levels of security to maintain the system and data integrity. The system manager can permit users to access only elements of the system by checking the boxes which apply to that user. Only the Administrator Authority can add and edit user permissions.
Capital Editor Access
If checked on the user will have access to the Capital Editor Menu item (default checked off). If this module is not registered the menu item will not be selectable.
Access to “Activity” Screens
Inspections and Works Order activity access can be provided to relevant maintenance and inspection staff. If not checked on the user will not have access.
Edit Road Asset/Unit
Allows user to add, edit or archive road asset information, but not through capital editor (default checked off). This option is greyed out if RoadAsyst® is not registered.
Edit Pathway Asset/Unit
Allows user to add, edit or archive pathway asset information, but not through Capital Editor. (default checked off).
Edit Activities
Allows user to add, edit or signoff all activities (default checked on).
Edit Defects
All edit using the defect information pane view and save, when info is changed allow defect history to update to record that it has changed. (default checked off)
Close Defects
Enables users, including inspectors, to close a defect regardless of mode login.
Configure Defects
Turning this checkbox on allows access to ‘Defect Priority, ‘Set Defect Options’ (see Set Options below) and Defect Type forms (default checked off).
Archive Defects
User can delete or archive a defect (default checked off) without it being ‘fixed’.
Edit Asset Codes
Toggle read/write access to the Asset Codes Tables (default checked off).
Mobile Upload/Download
Having this option checked on will allow that user to transfer data to and from the mobile device (default checked off).
Inspection Configuration
To edit the Inspection Frequency or Patterns forms the user must have this option check on (default checked off).
Access Ancillary GIS Layers
Users will have the ability to add additional GIS layers to the workspace without needing the GIS manager to create the workspace. (default checked off).