
Main Screen Windows
The main screen has four panels:
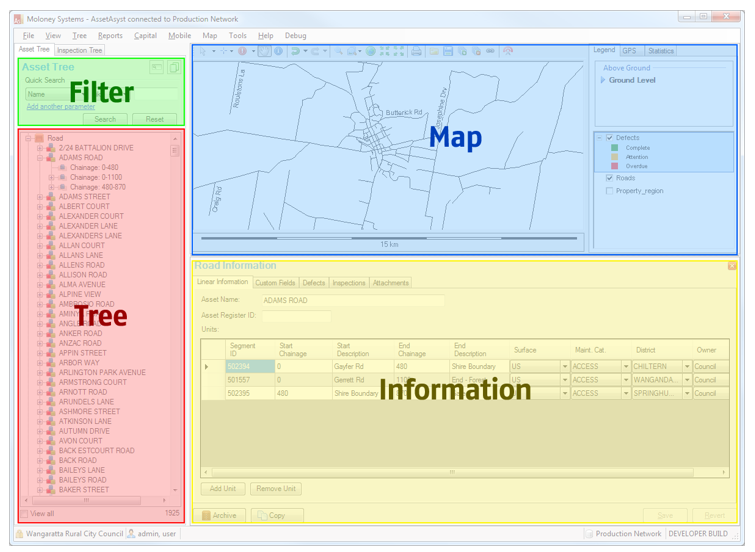
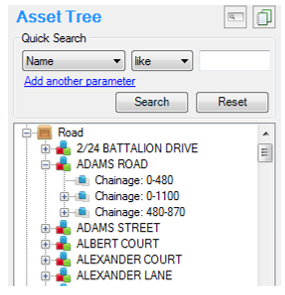
Filter Pane
The Filter Pane enables easy searching of the data in AssetAsyst®. Depending on the current tree that is being displayed, the filter options will change to be contextually relevant.

Tree Panes
There are two tree views that can be displayed. The first shows items in AssetAsyst® such as Assets, Units and Defects. The second tree shows actions, such as Inspections and Work Orders. To access the different trees, right click on the tree header text (e.g. “Asset Tree”) or click on the Tree Menu item and select a tree.
Item Tree (Assets)
This tree displays information about assets or asset units. The tree can be expanded to view sub-assets by clicking the plus symbol, or, by double clicking on the text. The sub-assets are called units.
Single clicking on an item in the tree will open the relevant information form for that item.
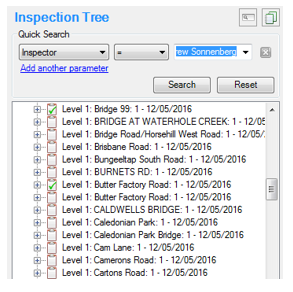
Activity Tree (Activities)
This tree displays information about activities like Inspections or Works Orders. There is a specialised type of inspection called a service request. By default, service requests are not shown in the tree. Tick the “View Service Request” check box to make them show up.
Bulk Re-Assign Inspections
You can re-assign inspections with new due dates or inspectors directly from the inspection tree. Just filter the tree as you desire, then click the "Re-Assign Open Inspections" link.
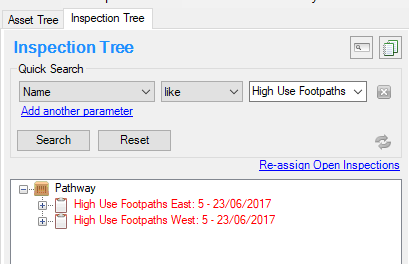
Select a new inspector. If you want to change the due date, tick the box and select a date. Then click Re-Assign.

The Map Pane
Users can operate the key functions of AssetAsyst® using the map pane. Assets, defects and other mapping layers can be displayed as long as they have a valid projection. If all layer projections are set, AssetAsyst® will automatically handle mixed projections. Inspections and works can be managed through the map interface.
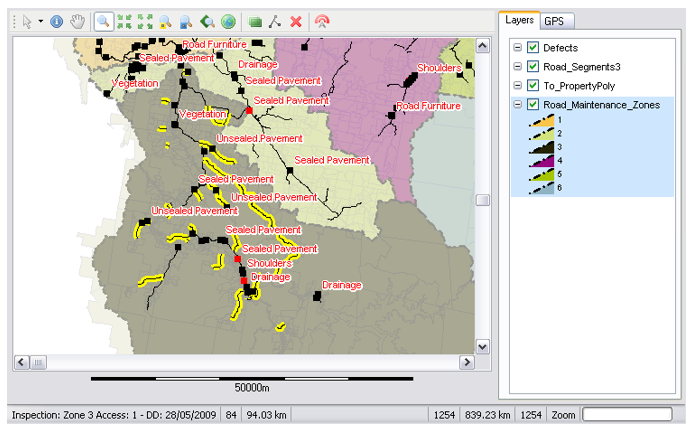
The map contains standard GIS functionality and is compliant with all GIS file formats including some CAD and image based formats.
A map toolbar allows users to access functions quickly and easily.
The projection of the defect layer can be set in the Mapping page of the AssetAsyst® options screen. This will also set the viewer projection so any layer added that is of a different projection will be re-projected.

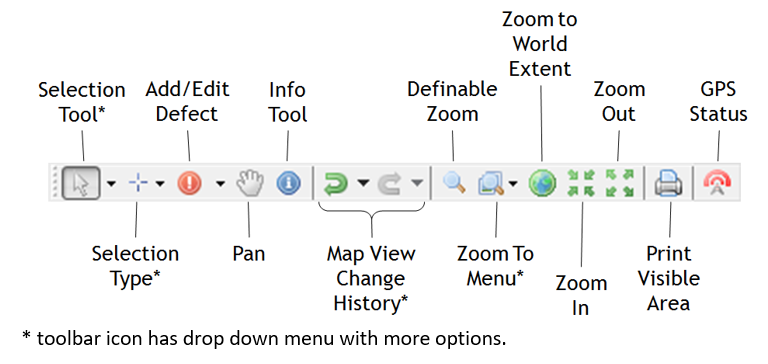
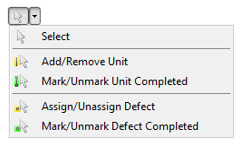
Selection Tool
The selection tool is used to choose a specific action that you want to carry out when you click or drag on the map.
Use the options in this menu to:
- Select an asset or defect in the map window
- Add or remove unit(s) from the current inspection
- Mark unit(s) completed (i.e. inspected) that are on the current inspection
- Add or remove defect(s) from the current work order
- Mark defect(s) completed (i.e. signed off) that are on the current work order
Selection Type
These options control use you select GIS objects with the mouse. Point: each click will add/remove an item Rectangle: click-drag to select multiple items in a rectangular area Freehand Lasso: click-drag to draw a shape that surrounds the desired items Polygon Lasso: click around the desired items to draw a polygon, click on starting point to finish Partial Selection: when ticked, items that are half in, half out of the selection will still be selected. Unticked means only shapes that are completely in the selection will be selected
Holding down Alt when using Rectangle, Freehand or Polygon will remove the desired items from the current selection.

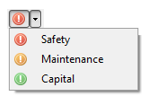
Add / Edit Defects
When this tool is selected, clicking on the map will add a new defect, or allow you to edit an existing defect that is nearby. There are three categories of defect that can be added in AssetAsyst®, Safety, Maintenance and Capital.
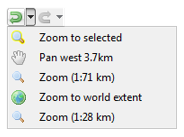
Zoom To
Use these options to zoom the GIS view to the desired objects.
Selected Layer: zoom to the extent of the selected layer in the legend
Filtered: zoom to the extent of all shapes that have been filtered (blue outline)
Selected: zoom to the extent of all shapes that have been selected (yellow outline)
Completed: zoom to the extent of all shapes that have been completed (green outline)

View History
Map View Change History allows you to navigate back and forth from changes to the view. For example, if you were looking at an asset, but clicked on an inspection (which moves the map), you can undo the view change to go back to what you were looking at.
Information Pane
The “Information Pane” provides detailed information on the item selected from either the top or bottom trees. This pane will share the space that is also assigned to the map pane.
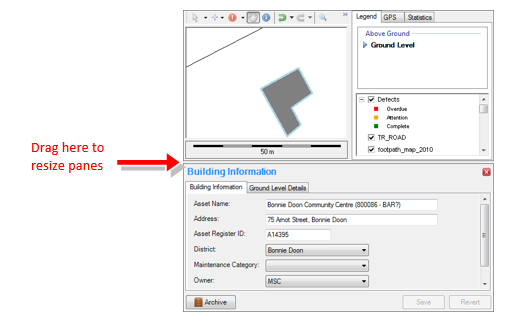 The information pane is often subdivided into different pages of data. You can view these pages as separate tabs, or expandable scrolling sections.
Tab View Option
Scrollable View Option
 In the scrollable view mode, the various sections can be expanded and contracted by clicking on the headings.

The alternative view can be displayed by toggling between the Tabs and Scrollable Sections radio button on the AssetAsyst® Options form.

Asset Tree
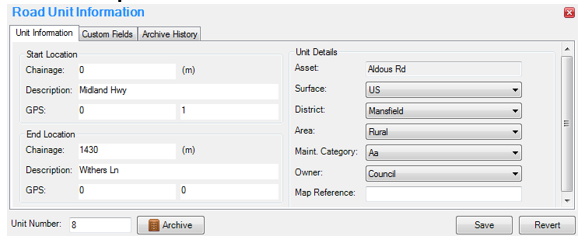
AssetAsyst® uses units as the base asset management element for renewal programs, maintenance & inspection scheduling and financial reporting. The exact meaning of a unit varies depending on asset type. For example, the unit of a road or path is considered a segment from one chainage to another, the unit of a building could be one room or one floor, while the unit of a bridge corresponds to a particular component on the structure.
AssetAsyst® is structured such that it will cater for any type of asset by allowing input of common attribute data against each unit. The road asset unit can store information about maintenance category, district, surface, owner and chainages etc., while the bridge asset unit can store information on the quantity of the component and whether or not it is part of an original structure or a widening/lengthening/etc.
NOTE: Users that have registered the Capital Editor Module will not need to use the editing or archiving features referred to in the following pages. However, the capability will still be available for users who wish to use it.